I think when every developer decides they want to make their own website, they want to make it completely from scratch. For blog purposes though, I found making my own website from scratch to be a little redundant and unneccesarily stressful. I know there are a lot of people that share this sentiment and opt for Wordpress. However, I wanted more flexibility/control and to experiment with some newer and more exciting applications.
This is when I found Hugo, an open-source static site generator built on Go. What makes Hugo stand out from other SSGs (Static Site Generators) is its exceptional speed, efficiency, and flexibility. Hugo is a great service, and I really recommend them to anyone who wants to create their own blog. If you are interested in how I configured my site with Hugo, check out my Blog GitHub Repo.
For actually deploying my website, there are a couple steps it can be boiled down to:
- Store the Hugo website on a local machine to make edits
- Push website changes from local machine to GitHub
- Use GitHub Actions & rsync to automatically upload the HTML and CSS files to a directory that is mounted to a Nginx Docker Container in my Oracle Cloud Virtual Private Server upon a GitHub push
- Have a Docker network on my VPS with a Caddy container to handle HTTPS and reverse proxying and a nginx container to actually serve up the website with the HTML and CSS files transferred.
I know there are simpler ways to create/deploy websites, but I really wanted to create a fully autonomous workflow that utilizes a docker stack in case I want to create multiple websites on my server.
- Note: I use an Oracle Cloud VPS, but you could use DigitalOcean, AWS, Vultr, etc… I personally enjoy using DigitalOcean, but their cheapest option is $5/mo which is a little too expensive for this project. This is why I used Oracle Cloud, as their free tier suited my needs (4 Arm-based Ampere A1 cores and 24 GB of memory).
Building website + pushing changes to my Oracle Cloud VPS
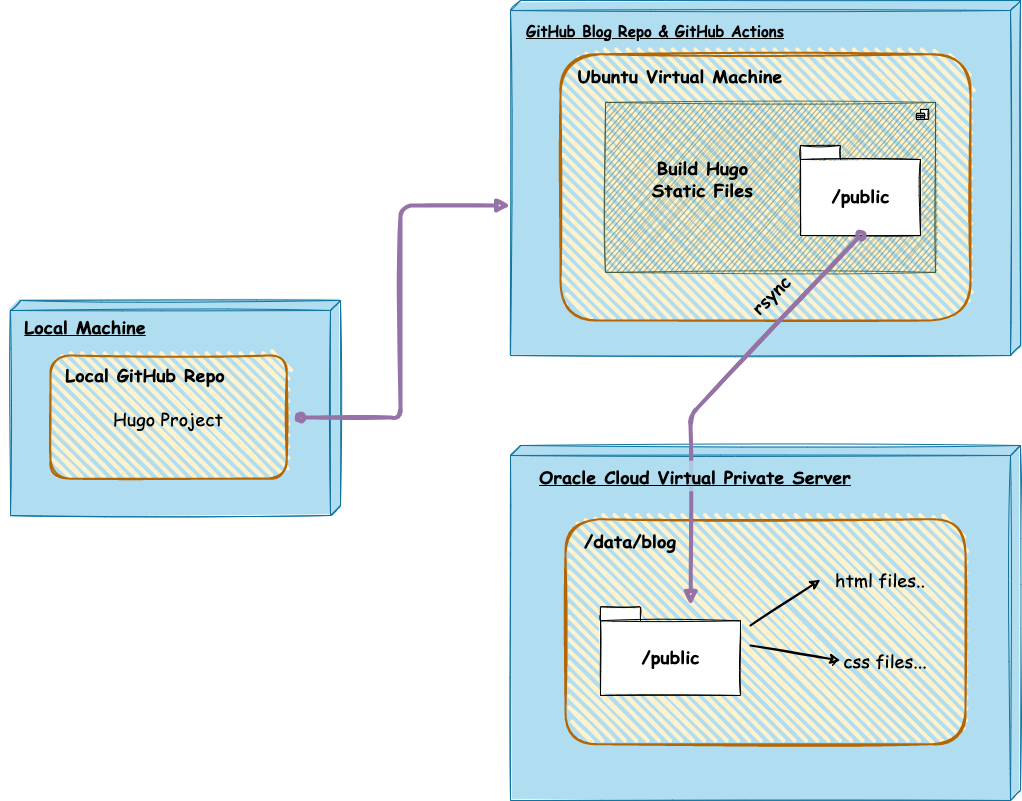
For actually building and changing the content of my website, I do it all locally on my MacBook Pro. This is the general flow of how the changes are then sent to my Virtual Private Server.
Local Machine
I first created a GitHub repository and then cloned it to my local machine. I then created a new Hugo project with hugo new site SITE_NAME -f yml. If you desire to spin up a Hugo site, I recommend this tutorial on their website. This local repository is where I change all my website configurations to how I like, and this is also where I write my blog posts (in markdown). I can easily see how my changes look by running hugo server, as this will spin up a local version of the website on localhost. If I actually want to push the changes / posts onto my website (jchun.me), all I have to do is push my changes to the main branch. This leads us to the next step:
Github Actions + rsync
I actually discovered GitHub Actions from this project, and man it is amazing. GitHub Actions is a CI/CD (continuous integration and continuous delivery) platform that allows you to automate your workflow across pushes, pull requests, etc. In other words, whenever I make a push to my repository with a new post or change, GitHub Actions can automatically build the static files for my website in a virtual machine and send them to my Virtual Private Server for deployment. When my VPS recieves the changes it will automatically render up the new HTML & CSS files, allowing for a smooth autonomous deployment.
You can create a workflow with a YAML file in the special .github/workflows folder inside your repository. This is what my YAML file looks like:
name: Hugo CI & Deploy

on:
    push:
        branches:
            - main

jobs:
    build:
        name: Build and deploy website
        runs-on: ubuntu-latest
        steps:
            - name: Checkout
              uses: actions/checkout@v3
              with:
                  submodules: true
            - name: Setup Hugo
              uses: peaceiris/actions-hugo@v3
              with:
                  hugo-version: "0.91.2"
                  extended: true
            - name: Build website with Hugo
              run: hugo --minify
            - name: Deploy website with rsync
              uses: burnett01/rsync-deployments@5.2
              with:
                  switches: -avzr --quiet --delete
                  path: public/
                  remote_path: ${{ secrets.REMOTE_PATH }}
                  remote_host: ${{ secrets.REMOTE_HOST }}
                  remote_user: ${{ secrets.REMOTE_USER }}
                  remote_key: ${{ secrets.REMOTE_KEY }}
To break this down a bit, the workflow is triggered every time I push to the main branch. It will then do the job “Build and deploy website”, which consists of a couple steps.
- Creates a virtual machine that runs on the latest version of Ubuntu Linux.
- Checkouts the repository onto the virtual machine so that it can access all of the contents.
- Installs Hugo on the virtual machine.
- Generates the minified HTML & CSS files on the virtual machine’s
/publicfolder with thehugo --minifycommand. - Uses rsync to transfer the static files in the
public/folder to the directory in my Oracle Cloud VPS that is that is mounted on my Nginx Docker Container.
- Note: To use rsync you will need to add the remote path, host, user, and SSH Private Key to your VPS. You should add these into your repository’s “secrets” for security purposes.
Deploying website on a Caddy Docker stack with Nginx
Docker
As I have mentioned already, I decided to use Docker to containerize my website. Very generally speaking, Docker is a software platform that allows you to deploy applications as self-sufficient containers that contain all dependencies like libaries, system tools, code, etc. Essentially, Docker enables you to separate your applications from your infrastructure so that you can build once and run anywhere.
One cool thing about Docker is that you can create a Docker Network, that allows you to connect different containers together. To create a Docker Network, simply write up a Docker Compose file. For my website, I created an external network, “web”, that connects a Caddy container and a Nginx container. Docker allows you to mount directories on containers, and this is how my Caddy container is able to read its Caddyfile (/data/caddy/Caddyfile) and my Nginx container is able to access the contents to upload to the website (/data/blog).
Creating a docker network in the docker compose file
networks:
    web:
        external: true
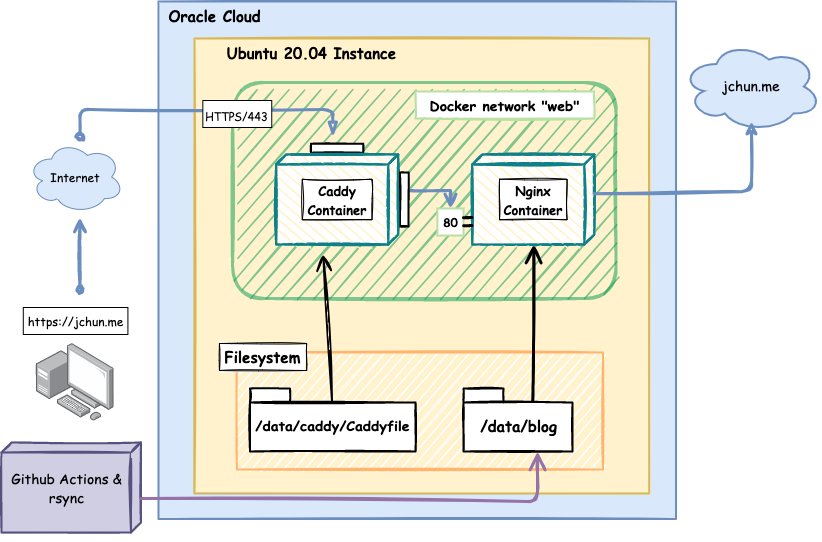
This is a simplified diagram of what my VPS looks like with the Docker network:

To break this down a bit…
Caddy
Caddy is an open-source web server written in Go with a number of really nice features like HTTPS, reverse proxying, routing, being container based, etc. The 2 main reasons why I use Caddy is for its automatic TLS certificates from Let’s Encrypt to enable HTTPS on your websites and its reverse proxy capabilities.
Nginx
Nginx is also an open-source software used for web serving, and it can be used for reverse proxying, caching, load balancing, etc. I used Nginx in the back-end to actually host my website and serve up my static files as it consistently beats Apache in benchmarks.
With a Docker network, you can put all of the containers in a completely private and isolated network. The only container/ports that are open on my network are Port 80 (HTTP) and Port 443 (HTTPS) on my Caddy container. My Nginx container cannot be reached directly from the outside. If a user tries to connect to https://jchun.me, my Caddy container will redirect them to Port 80 on the Nginx Container’s private IP address - where the contents of the website are actually hosted.
This is what my docker compose file looks like:
services:
    caddy:
        image: caddy:2-alpine
        restart: unless-stopped
        ports:
            - "80:80"
            - "443:443"
        volumes:
            - /data/caddy/Caddyfile:/etc/caddy/Caddyfile
            - /data/caddy/data:/data
            - /data/caddy/config:/config
        networks:
            - web

    nginx:
        image: nginx:latest
        restart: unless-stopped
        environment:
            - url=https://jchun.me
        volumes:
            - /data/blog:/usr/share/nginx/html
        networks:
            - web
And this is what my Caddyfile looks like:
{
    # Insert email for Let's Encrypt (HTTPS)
    email hostname@email.com
}
jchun.me {
    reverse_proxy nginx:80
}
www.jchun.me {
    redir https://jchun.me{uri}
}
Future
For right now, I think this set up is a little overkill… However, my goal in the far future is to host multiple websites on my VPS, and I wanted to explore Docker some more so I’m happy with the result. For the immediate future though, I would like to set up a Varnish Cache to speed up the the building of my website. I’ll never really need it for the purposes of this website 😆 but I would like to explore.