I just finished up v1 of Pym, and I wanted to make a post that delved deeper into what’s going on under the hood. If you want to learn more about what Pym is and how to use it, check out this blog post.
GitHub Repo: https://github.com/joshhchun/Pym
Backend (Express / Node.JS)
This was my first time experimenting with a JS backend, and I loved it. I built Pym with Express, but I definitely want to migrate to Typescript at some point and explore things like Next.js, Vercel, Prisma, and tRPC next.
For the API Endpoints, I had 3 different routes.
- Display
- Image
- Save
Display (GET Endpoint)
The Display endpoint handles RESTful GET requests to /api/{:id}, where id is a unique 4 character ID of a post. The program first tries to find a post in the Mongo Database with the id given in the URL. If a post is found then a status 200 response with the post’s data (group, language, value) is sent. If there is no post found with the given ID the catch statement sends a null response.
Because I wanted to have a LRU-like deletion mechanism, I update a posts expiration date every time it is accessed through this endpoint.
// Function to update the expiration time
function updateExpire() {
    var date = new Date(); // Now
    date.setDate(date.getDate() + 15); // Set now + 15 days as the new date
    return date;
}
// API Endpoint to retrieve post data from the database
router.get("/:id", async (req, res) => {
    try {
        const post = await Post.findOne({ shortId: req.params.id });
        res.status(200).json({
            value: post.value,
            group: post.group,
            language: post.language,
        });
        post.expireAt = updateExpire();
        await post.save();
    } catch (e) {
        console.log("No Post with that ID!");
        res.json(null);
    }
});

module.exports = router;
Save (POST Endpoint)
The Save endpoint handles RESTful POST requests to /api/save. In this endpoint I have multer configured which is a Node.js middleware for handling mutlipart/form-data (files).
When a new request is sent to the endpoint, the program first calculates the SHA256 Hex Digest of the post’s contents.
// Function to find the SHA256 hash of the file
const hashFile = (content) => {
    const hashSum = crypto.createHash("sha256");
    hashSum.update(content);
    return hashSum.digest("hex");
};
The program then searches the database for a post that has the same hash. If a post is found in the DB then the existing short ID will be sent and a new post will not be created.
// Function to check if the hex digest of newly uploaded file is already in the database
async function checkHash(hexDigest, file) {
    try {
        const post = await Post.findOne({ hash: hexDigest });
        if (post) {
            // If the hash already exists then delete the newly uploaded file
            if (file) {
                fs.unlink("/usr/src/app/" + file.path, (err) => {
                    if (err) console.log(err);
                });
            }
            return post.shortId;
        }
        // If hash content does not exist then return null
        return null;
    } catch (e) {
        console.log(e);
    }
}
The reason why I decided to implement this was to prevent the same file/text being uploaded over and over. Although there is a slight time for memory trade-off, I believe it to be worth it.
If there is no post in the DB that matches the hash, then a new a post is created. I check whether the user is trying to save a file or text and I handle it accordingly.
If it is text it is fairly simple as all I do is create a post with the text & language sent with the request and set the group to text. I then send back the shortID that is auto-generated when creating a post.
const postScheme = new mongoose.Schema({
    shortId: {
        type: String,
        required: true,
        default: () => nanoid(4),
        index: { unique: true },
    },
    ...
If the request contains a file then I have to handle it a little differently. This is because I dont actually save images in the database.
I currently save the files in the filesystem and then save the file path in the database. Although this makes my life a little bit harder now, if I ever wanted to scale up and use AWS, a S3 Bucket, or Google Photos to store my images then I would have no problem scaling as I only store the path or url.
So if the file is an image then I simply store the filepath and set that as the posts value. If the file is a text type however (.txt, .js, .py, etc) then I actually read the file into a buffer and save it as a text post.
// Function to handle if the user uploads a file
async function handleFile(hexDigest, file, response) {
    // If the file is a text (or code file) then treat it as a text post
    let fileBuffer = "";
    if (file.mimetype in textMimeTypes) {
        fileBuffer = fs.readFileSync("/usr/src/app/" + file.path).toString();
    }
    Post.create({
        expireAt: updateExpire(),
        group: fileBuffer ? "text" : "image",
        value: fileBuffer ? fileBuffer : file.path,
        hash: hexDigest,
        language: textMimeTypes[file.mimetype],
    })
        .then((res) => {
            console.log(res);
            return response.status(200).json({ shortId: res.shortId });
        })
        .catch((e) => {
            console.log("error: " + e);
        });
}
Image (GET Endpoint)
Because the images are stored in my Node.js Backend Container, my React.js-Nginx Container does not have direct access to them (unless I use a volume but I was experiencing troubles with that).
So when a user tries to see a post that contains an image, the frontend will simply call this Image API Endpoint which returns the image.
src={"https://pym.jchun.me/api/image/" + id}
Frontend (React.js / Material UI)
Writing about Frontend is kind of boring - HTML and CSS wooooo…
So I’ll just skim over what my thinking process was like. If you want to see every component just check out my GitHub Repo linked at the top of the page.
Routing
On the top layer, I use React Router to handle all of the routing on my frontend.
function App() {
    return (
        <div className="App">
            <Router>
                <Routes>
                    <Route path="/" element={<Home />} />
                    <Route path="/newtext" element={<NewText />} />
                    <Route path="/newfile" element={<NewFile />} />
                    <Route path="/url" element={<URL />} />
                    <Route path="/:id" element={<Display />} />
                </Routes>
            </Router>
        </div>
    );
}
pym.jchun.me is considered the root URL, so the path / corresponds to https://pym.jchun.me/ and /newtext corresponds to https://pym.jchun.me/newtext.
As you can see depending on the route the user is trying to access, I display a different component.
New Post
The NewText, NewFile, and URL components are for when the user wants to create a new post. In terms of functionality, they all work pretty similar.
They all have some type of input field (Text Box, Selects, etc), where the state is managed by React. They then have some sort of button where when clicked there is some kind of POST request made. For example, this is the request made when a user tries to save a text paste.
// Function to handle when user clicks save button
const handleClick = async (e) => {
    e.preventDefault();
    const request = {
        group: "text",
        language: props.language,
        value: props.value,
    };
    try {
        const response = await fetch("https://pym.jchun.me/api/save", {
            method: "POST",
            headers: { "Content-Type": "application/json" },
            body: JSON.stringify(request),
        });
        const data = await response.json();
        navigate(`/${data.shortId}`);
    } catch (e) {
        console.log(e.message);
    }
};
As I discussed earlier, the /api/save endpoint responds with the short ID created for the post. When the frontend recieves the API’s response, it navigates to https://pym.jchun.me/{shortId}. This redirect is then handled by React Router which renders the Display component.
Display a Post
The Display component simply makes a GET request in the useEffect() hook and tries to retrieve the post from the DB that corresponds with the short ID in the URL.
let { id } = useParams();
// The post ID from the URL
const [isImage, setIsImage] = useState(false);
const [language, setLanguage] = useState("python");
const [text, setText] = useState("");

// Fetch the data from backend & database
useEffect(() => {
    // Function to fetch the data from backend
    const fetchData = async (id) => {
        try {
            const response = await fetch(`https://pym.jchun.me/api/${id}`);
            const data = await response.json();
            // If there is no data response then there is no post with the inputed ID
            if (!data) {
                setIsImage(false);
                setLanguage("plaintext");
                setText("No post with that ID! Sorry :P");
            } else {
                if (data.group === "link") {
                    window.location.href = data.value;
                } else if (data.group === "image") {
                    setIsImage(true);
                } else if (data.group === "text") {
                    setIsImage(false);
                    setLanguage(data.language);
                    setText(data.value);
                }
            }
        } catch (e) {
            console.log(e.message);
        }
    };
    fetchData(id);
}, []);
Deployment (Docker, Caddy & Nginx)
Containerizing & deploying this website with Docker on my VPS was very smooth and easy. This made me happy as I purposely went through extra trouble setting up a Docker Compose environment when initially creating my blog for this exact purpose.
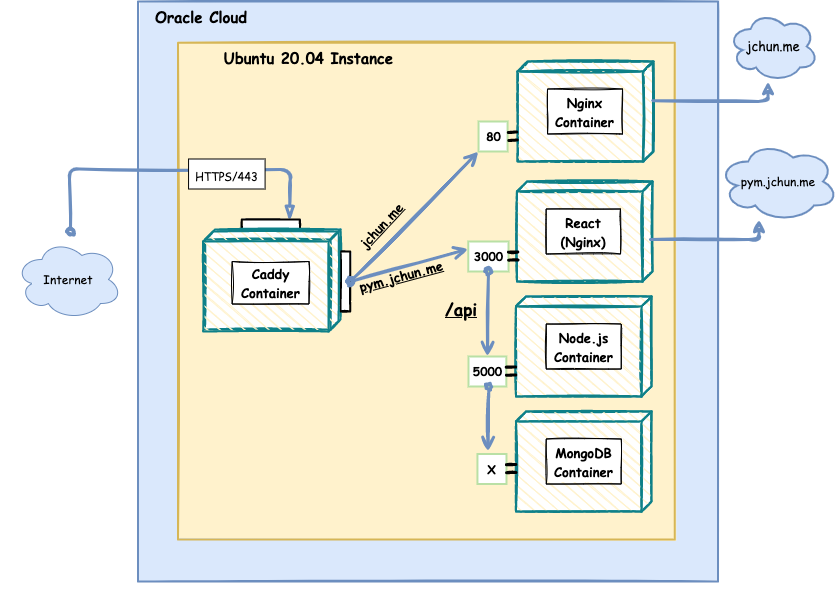
This is a simplified version of what my VPS looks like with all my containerized applications.

To break this down a bit… Pym is utilizing 4 containers:
- Caddy
- Nginx (React)
- Node.js
- MongoDB
Caddy
As you can see, I’m still using Caddy as my main reverse proxy service. It is extremely easy to configure and its automatic TLS Certification is 🤌
The Caddy container controls all HTTP/HTTPS requests to my VPS.
If a request is trying to connect to jchun.me, it simply redirects the request to port 80 on my blog Nginx container. If a request is trying to connect to pym.jchun.me Caddy will redirect the request to my React - Nginx Container.
{
    email joshhchun@gmail.com
    # Optional staging lets encrypt for testing. Comment out for production.
    # acme_ca https://acme-staging-v02.api.letsencrypt.org/directory
}

jchun.me {
    reverse_proxy nginx:80
}

pym.jchun.me {
    reverse_proxy pym-client:3000
}

www.jchun.me {
    redir https://jchun.me{uri}
}
React - Nginx
The reason why I’m using a Nginx image is because when you run the Production build on a React App, it won’t create a local web server like the development build does. Rather, the production build will minimize your source files into one or multiple compressed files to make rendering very quick and snappy.
Because it doesn’t create the local web server, you need something like Nginx or Apache to serve up your static files. The other pro of having a Nginx image to serve your react app is being able to reverse proxy your API Backend.
Here is what my Nginx Conf file looks like for my React Dockerfile
server {
  listen 3000;

  location /api {
    ...
    proxy_pass http://pym-api:5000;
    proxy_redirect off;
  }

  location / {
    root /usr/share/nginx/html/;
    include /etc/nginx/mime.types;
    try_files $uri $uri/ /index.html;
  }
}
So instead of having to make a completely new subdomain to access my Node.js Backend Container (like api.pym.jchun.me), I can simply make a request to the /api resource on pym.jchun.me and Nginx will proxy pass it to my Node.js container on port 5000.
Here is what my Dockerfile looks like for my React App:
FROM node:alpine as build
WORKDIR /usr/src/app

COPY package*.json .

RUN npm install

COPY . .
RUN npm run build

FROM nginx:latest
COPY --from=build /usr/src/app/build /usr/share/nginx/html
COPY nginx.conf /etc/nginx/conf.d/default.conf

CMD ["nginx", "-g", "daemon off;"]
As you can see, the Dockerfile first runs the build command to get the minimized files and then copies it over to the Nginx image. It then copies the custom Nginx config file to the newly made container.
This is what my overall docker compose file generally looks like
version: "3.7"

networks:
    web:
        external: true
    pym:
        external: true

services:
    # Caddy Container
    caddy:
        image: caddy:2-alpine
        restart: unless-stopped
        ports: ...
        volumes:
            - /data/caddy/Caddyfile:/etc/caddy/Caddyfile
        networks:
            - web
            - pym

    # MongoDB Container
    mongo_db:
        image: mongo:latest
        restart: always
        volumes:
            - mongo_db:...
        networks:
            - pym

    # Node.js Container
    pym-api:
        build:
            context: ../Pym/pym-api
            dockerfile: ./Dockerfile
        env_file:
            - ../Pym/pym-api/.env
        expose: ...
        ports: ...
        volumes: ...
        depends_on:
            - mongo_db
        networks:
            - pym

    # Nginx (React) Container
    pym-client:
        build:
            context: ../Pym/pym-client
            dockerfile: ./Dockerfile
        expose: ...
        ports: ...
        volumes: ...
        networks:
            - pym
        links:
            - pym-api

volumes:
    mongo_db: {}
    uploads: {}